Pages

Tuesday, December 20, 2011

Microwave Cake Pops

How many of you have seen magazines and even cook books that are featuring CAKE POPS? How many of you thought, that is way to much work for me? Well, I've got a tip that will cut down nearly half of the time it takes to cook and prepare these new sensations. MICROWAVE the cake itself. Yes, its true. You can microwave a box of cake mix. Instead of taking around 40 minutes in the oven, you can cook a cake in the microwave for about 10 minutes!
What you'll need to make your cake pops:
Cake Mix
Frosting
Lollipop Sticks
Cake pop stand or Styrofoam
Melting Chocolate ( I bought red and green for the Holidays!)
Sprinkles (Optional)


Directions
Start out by following the directions on the back of the cake mix box. Make sure you grease your glass dish, and pour your cake batter into that. Place in the microwave and set the timer for 10 minutes. All microwaves are different and you may have to cook your cake for a longer or shorter amount of time. Make sure the majority of the cake has rose. If the center is still somewhat liquid, or giggly as I like to say, that's okay! Leave the cake set on your counter for 10 minutes, this will allow the cooking process to finish. After 10 minutes ensure the cake is now finished. If not put back into the microwave until it is done. You can now allow the cake to cool.
Ignore the mess in my microwave ;)

Cake after taking it out of the microwave
After the cake is cool, you want to get a large mixing bowl and transferring the cake to the bowl. Obviously, it doesn't matter if you have to take the cake out in pieces, as we are going to mix it up anyways. I find it easiest to mix the cake with a mixer to get the cake into tiny crumbs. But whatever is easiest for you, is just fine.

Cake crumbs!
When the entire cake is now into tiny crumbs, you can start adding your frosting. You'll most likely need around 1/2 to 2/3 of the frosting, but add it in small parts. You can simply use your hands and just mix the frosting with all of the cake crumbs. Ultimately you want to frosting to act as a cement, so that when you roll the balls up they stick and stay put. If that doesn't happen, and your cake balls start to crumble, simply add more frosting. You'll find the perfect amount for your cake mixture, everyone will be different.


What your mixture should look like after adding frosting
When your cake crumbs don't need anymore frosting, you can start rolling them up into small balls and putting them on a cookie sheet. I got 36 cake balls out of my cake mix. Once you are all finished rolling up your balls. Place your cookie sheet in the refrigerator for 1 hour, so they can harden up. 
Rolled up cake balls

After impatiently waiting that long 1 hour, take your balls out of the refrigerator! You can start melting the chocolate in 30 second intervals, until it is completely melted. Dip the end of your lollipop stick in chocolate and then put the stick into your cake balls. Making sure to do one ball at a time, so the chocolate is still sticky when placing your lollipop stick in the cake balls. Yet again, put your cake balls back in the refrigerator to harden up.

After waiting around 15-30 minutes, take your balls out of the refrigerator. You'll most likely have to remelt your chocolate again. Now you can start dipping the entire cake ball into your melted chocolate! If you chose to buy sprinkles, immediately dip your chocolate covered cake ball into a bowl of sprinkles. Now is where the Styrofoam comes in handy. Place the lollipop stick into the Styrofoam so the chocolate will not smear if you were to lay it down. I used a cake pop stand I bought at WalMart, but either one will work just fine.Repeat for all of your cake balls!


Obviously you can create different styles and designs for the Holidays, add some pretzels to the top and your cake pop could be a reindeer! Hope you enjoyed this recipe. Let me know if you decide to try this for yourselves and how it worked out for you! Happy Holidays!!

Sunday, December 18, 2011

Nailpolish Christmas Bulbs

If you guys are anything like me, then you'll love this super EASY way to make your own Christmas bulbs. It's a fun way to get the kids involved too! I got this idea from SayAnythingBrooke from Youtube!


All you need is:
You can find these bulbs at most craft stores!

  • Clear Bulbs (Glass or Plastic)
  • Nail polish
  • Paper towels
  • Ribbon (optional)


First make sure you are in a well ventilated room, because the nail polish will start to get stinky!


Next, put a few layers of paper towels down on the flat surface you will be working on. Just in case you have a few spills.


Get your bulbs out, and take the top off of them, making sure to put it aside because you will need to recap it later! Also keep the container the bulbs came in so we can use this to store our bulbs while they are drying.


Now, pick out some of your nail polishes, preferably the cheaper ones because you will be using about half of the bottle for these bulbs.  Also, you want to pick different colors or ones that have glitter so your bulbs will stand out.


Now, all you've got to do is pour the nail polish inside the bulb. 
Start out with a generous amount, and just keep turning the bulb until the polish starts to get tacky and stops moving. (This does take patience, as this can take several minutes to completely coat the inside of the bulb). Now when you have covered the entire inside of the bulb, you can add a different color or you can stop there!


All you've got to do is put the bulb, top first back into the container they came in. This way all the excess polish will drain out. (Make sure to leave the tops of the bulbs off overnight)


Leave the bulbs overnight!


*Notice how the bulbs are upside down so the polish can drain out
Now this last step is optional. I added some ribbon to my bulbs. Simply cut off some of your ribbon, and make a bow around the top. Make sure to put the top back on, and now you can hang it from your tree!!!


These make great gifts for someone who is hard to     buy for and has everything. Also a great gift for those nail polish lovers, put their favorite nail polish in the bulb and they can enjoy it hanging on their tree!!


Thanks so much for reading, make sure to comment and let me know how this worked out for you!!


Thursday, December 8, 2011

Chalkboard Cabinets

So I saw this picture of a kitchen cabinet with chalkboard paint on the inside, and OF COURSE, I had to try it out for myself. Luckily I had the chalkboard paint already. So it was basically a nobrainer! I asked Josh what he thought about me putting chalkboard paint on the inside of our cabinets, and being the lovely man he is, said "I figured you'd eventually do something like that!" He knows me so well!


You'll Need.


  1. Chalkboard Paint (You can get this at Walmart or any craft store)
  2. A paint brush of some sort
  3. Painters Tape (I'm so impatient and couldn't wait to go to the store to buy painters tape, so I used duck tape. Which worked out really well in the end.)
  4. Sandpaper (optional)
So if the cabinet you plan on adding the paint to has a finish on it, you may want to sand it a tiny bit so the paint will stick. I was too afraid of ruining the cabinets, if the paint didn't come out right, so I DIDN'T sand it. It's all up to you.


Next take your painters tape, or whatever tape you've got, and tape off the section you want to paint. I started small so if it was awful I didn't have to big of a mess to clean up.


Now just start putting the paint on. My cabinets are white and glossy, so I probably had to put 5 coats of paint on to get it the way I really liked it. The instructions on the paint say to wait 1 hour in between layers, I just wanted until it was dry. 15 minutes or so!


It's so simple! When the paint is dry and you think you have enough layers of paint on, go ahead and take your tape off, be gentle!
That's IT. It's such an easy project and it turns out great!

                                                        The finished product!!!!!

Monday, December 5, 2011

Nutella Puppy Chow!

I am completely obsessed with anything containing nutella, and I am always on the hunt to find recipes I can incorporate nutella into. With Christmas time just around the corner, its a great recipe to substitute some cookies for. My family tradition is to always cook tons and tons of Christmas cookies, and it gets to be a lot. So this year i'll be making one less batch of cookies and this puppy chow instead!

NUTELLA PUPPY CHOW
recipe from Healthy Tasty Chow


1/2 cup butter
1 cup Nutella
3/4 cup chocolate chips (use semi-sweet or dark, milk would be far too sweet and you’d lose the chocolate flavor)
3/4 cup white chocolate chips
2/3 cup hazelnuts
13 cups (more or less) or one 12oz box of hearty wheat/corn/rice cereal like Crispix or Chex – try to find a hearty version so it doesn’t break down when stirring
3 cups powdered sugar


In a 350 degree preheated oven, roast hazelnuts until fragrant and light brown, about 8 minutes
Allow to cool and remove as much of the skin as you can with a towel
Grind up hazelnuts finely in a food processor
Put the cereal in a large bowl and set aside.
In a pan over medium-low heat, melt butter, chocolate, and white chocolate, stirring constantly.
When all is melted, remove from heat and add Nutella and stir until mixed in, then add hazelnuts and stir well.

Slowly pour over cereal.

Stir with your hands! (make sure they are clean first!) It is MUCH easier than with a spoon. It may take some time since the the batter is thick.

Dump into a gallon size zip-lock bag and pour in powdered sugar. Start out with a little and add more as needed. You don't want them TOO coated with powdered sugar because they will end up tasting to sweet.

Zip up the back and shake it until they are coated.

ENJOY!!

Tuesday, November 29, 2011

CrockPot Breakfast?

If you read the title of this article and are thinking, what in the world you could possibly make for breakfast in a crockpot, so was I about one day ago! But, it is possible!

All you have to do, is put all the ingredients in the crock pot and let it cook overnight! It's a great idea if you have a busy morning and never enough time to cook an actual meal, plus it tastes GREAT.


INGREDIENTS
6-8 strips of bacon
1 onion peeled and chopped
1 clove garlic, peeled and minced
1 red or green pepper, seeded and chopped
1 (2lb) bag of frozen hash browns
1 1/2 cups shredded cheese
12 eggs
1 cup whole milk
1 tsp. dried dill
1/2 tsp. salt
1/2 tsp. pepper

DIRECTIONS-
Spray the crock pot with a non-stick cooking spray. Cook bacon til crisp cool, then chop into small pieces, and set aside. Saute onion, garlic and bell pepper for 5 minutes. Place 1/3 of frozen hash browns in the bottom of the crock pot. Add 1/3 bacon and 1/3 onion, garlic and pepper mixture and 1/3 cheese. Repeat layers, ending with cheese.

In a large bowl mix eggs, milk, dill, salt and pepper. Pour over ingredients in crock pot, cover and turn on low. Cook 8-10 hours.

Tuesday, November 22, 2011

Tips to make your life EASIER.

If I know you all, like I know myself, there is not enough time in the day to get all the things you need to do, done. I am always on the lookout for shortcuts that don't necessarily cut on quality, but still get the job done. So today I am letting you in on a few new secrets I have learned that have truly impacted my life ;)


Have a waffle maker? Love brownies? Why not make your brownies in your waffle maker. Yes it is true! Brownies can be made in a waffle maker, usually takes around 5 minutes! That's nearly a 25 minute save right there! Along with brownies, you can also cook muffins and hash browns in your waffle maker as well!


Do you have an awful time cleaning your shower head? I know I do! We just moved into our new house a little over 2 months ago and the shower heads were NASTY to say the least. Some of them didn't even spray through all the little holes. So I spent a long time cleaning each individual hole with a tooth pick and a rag. Too bad I didn't know this trick then.

Simply pour distilled white vinegar in a plastic baggy, put it over your shower head and secure with a rubber-band! Let that baby soak for 1 hour, remove, wipe off the shower head, and your done!


That is just a FEW of the many new tricks I am learning! I'll be sure to share more when the really good ones come along!

Tuesday, November 15, 2011

Newspaper Nails.

Every want to have those super beautiful "fresh from the salon" nails for nothing? Well people you have not look no further!


You'll need:
Nail Polish
Rubbing Alcohol
Newspaper


1. Paint your nails a light color. Make sure your nails are dry before moving onto the next step!!
2.Pour the rubbing alcohol into the cap and soak your finger in it for about 5 seconds.
3. Take a small piece of the newspaper and press it onto the wet nail for about 15 seconds.
4. Make sure you apply a top coat, if not the ink will begin to rub off!

It's that simple!!

Sunday, November 13, 2011

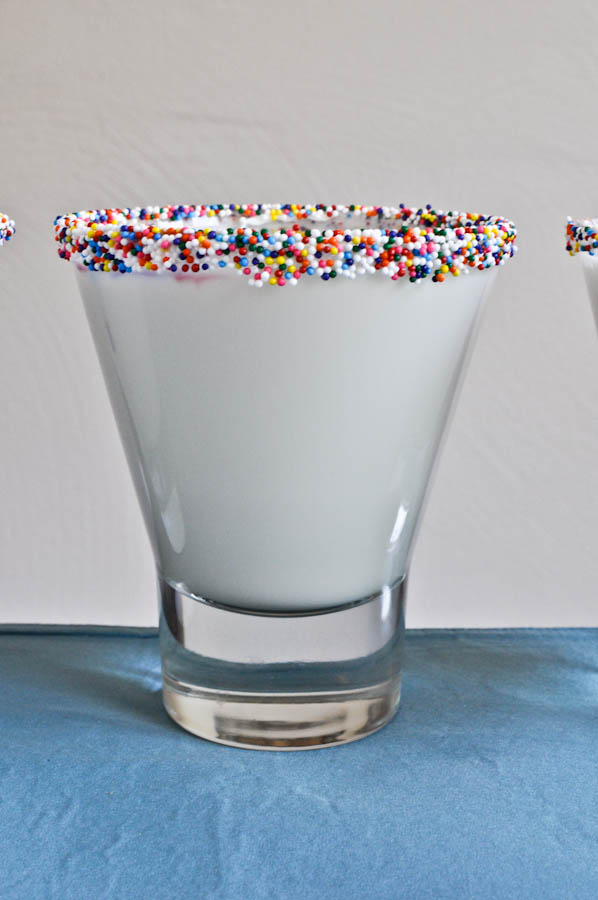
Cake Batter Martini!!!!

Hello and welcome back! Sunday is going to be dedicated to recipes for food and or great alcoholic drinks ;)

Today's recipe comes from http://www.howsweeteats.com

I didn't come up with this fabulous idea, however I am going to share it with you guys, just because it is that great!


Cake Batter Martinis

makes a single serving, is easily multiplied
1 ounce amaretto

1 1/2 ounces Pinnacle whipped cream vodka

1 1/2 ounces creme de cacao

1/2 ounce Godiva white chocolate liqueur

1 ounce heavy cream

assorted sprinkles (nonpareils work best)

frosting

Using your finger, coat the rim of your glass with frosting – make sure not to miss any spots! Dump sprinkles on a plate and press glass rim into sprinkles, pressing to adhere. Combine all ingredients in a cocktail shaker with ice and shake for about 30 seconds. Strain into glass and drink!

Wednesday, November 9, 2011

The Look for Less!

2 looks in one day? Yes, I'm going through and trying to make a stock pile of these and I just couldn't not post another one.

My goal was to ultimately create the same look for a bargain.

The first look's grand total was over $2000, while the second looks total was only $60.

This just proves you can get the same style for a much cheaper price.

It is possible and you can do it!

What are your thoughts? Do you like the cheaper look?

The Look for Less!

Wednesdays will now be "The Look for Less" days.
So for the first installment........


Fashion doesn't have to be expensive, and you can obviously get "The Look for Less".

Friday, November 4, 2011

49 Days until Christmas.

With Halloween officially over, it's time to start counting down until CHRISTMAS. I'm not usually excited for Christmas, never really have been. BUT, this year Josh and I will be spending our Christmas in our new house TOGETHER. So we both are very excited about it.


Christmas decorations are in most of the stores now and I'm so excited to start decorating my home.

My question is, when do you start decorating for Christmas? Some people start as soon as Halloween is over, other people wait until Thanksgiving has come and gone. What are some of the traditions you do for Christmas? I'd love to hear them.

Do you decorate your Christmas tree in a theme, or is it all just random things?

Monday, October 31, 2011

Kim Kardashian Files for DIVORCE!

Well, I guess if you haven't seen any of the articles on the internet, you've been living under a rock, or just don't give a shit. Either way, I'm going to fill you in ;)


Kim Kardashian filed for divorce from her husband of a whopping 72 days, today. It seems like the family kept the information hush hush, and let Kim be the first to speak out.

Most of the tabloids are stating that the wedding was just a publicity stunt, much like Heidi and Spencer Pratt's wedding. It has been reported that Kim and Kris made over $18million from their wedding, well over what the wedding cost. I'm not going to go super psycho and say I know what Kim was thinking, but I honestly think she THOUGHT she was in love. We all saw her fall head of over heels for many guys on her television show Keeping Up With The Kardashians. How much of it was for tv and how much was reality? I can't say, but I think at the time she felt it was the right thing.

We can't forget Britney Spears annulment from her husband of a few short HOURS. So lets just give the woman a break?

Saturday, October 29, 2011

Venetian Mask

My sister and I really enjoy doing crazy makeup on each other, so to get us in the Halloween spirit, I decided to make a Venetian mask for her.

We whipped this out pretty quickly, i'd say within a half an hour we were done! We used simple face paint and some glitter, all very inexpensive and available at any Halloween store. I'm not going to go to in depth with what exactly we did unless people really request it.

So without further ado, here is HALEY!


Welcome.

Hello and welcome. I've made another blog in addition to my Halloween blog Visit it HERE (the one I haven't updated in ages ;)).

I really had the urge to write and didn't have the necessary outlet, thus I created this blog. I'll pretty much be writing about everything under the sun. You will definitely be surprised at all the different topics I will be touching. I'm determined to update this blog MUCH more often then my previous, and I am genuinely excited to start this adventure!